Calling all e-commerce customers!
Do you use Shopify to host your online business? If so, it’s easy to start tracking conversions across your Shopify site. This guide explains how to install the Outbrain pixel sitewide, as well as to track any of the following conversion points along a customer’s path to purchase:
Add To Cart
Checkout Intent
Purchase Confirmation
Adding the Outbrain Pixel Across Your Site
Let’s start by adding the Outbrain pixel across your Shopify site.
Copy the Outbrain pixel from the “Conversions” tab of your dashboard. If you have any trouble finding this, read over our conversions set-up guide here. Next, head to your Shopify account. Locate and click “Online Store” in the Shopify sidebar. Under “Themes,” click the drop-down “Actions” button. Then, select “Edit Code.”

Open “theme.liquid” in the Layout folder, and paste the Outbrain pixel at the end of the head tag in “theme.liquid” after “{{ content_for_header }}” and before the closing “</head>” tag. Don’t forget to click the “Save” button in the top-right corner to finish.
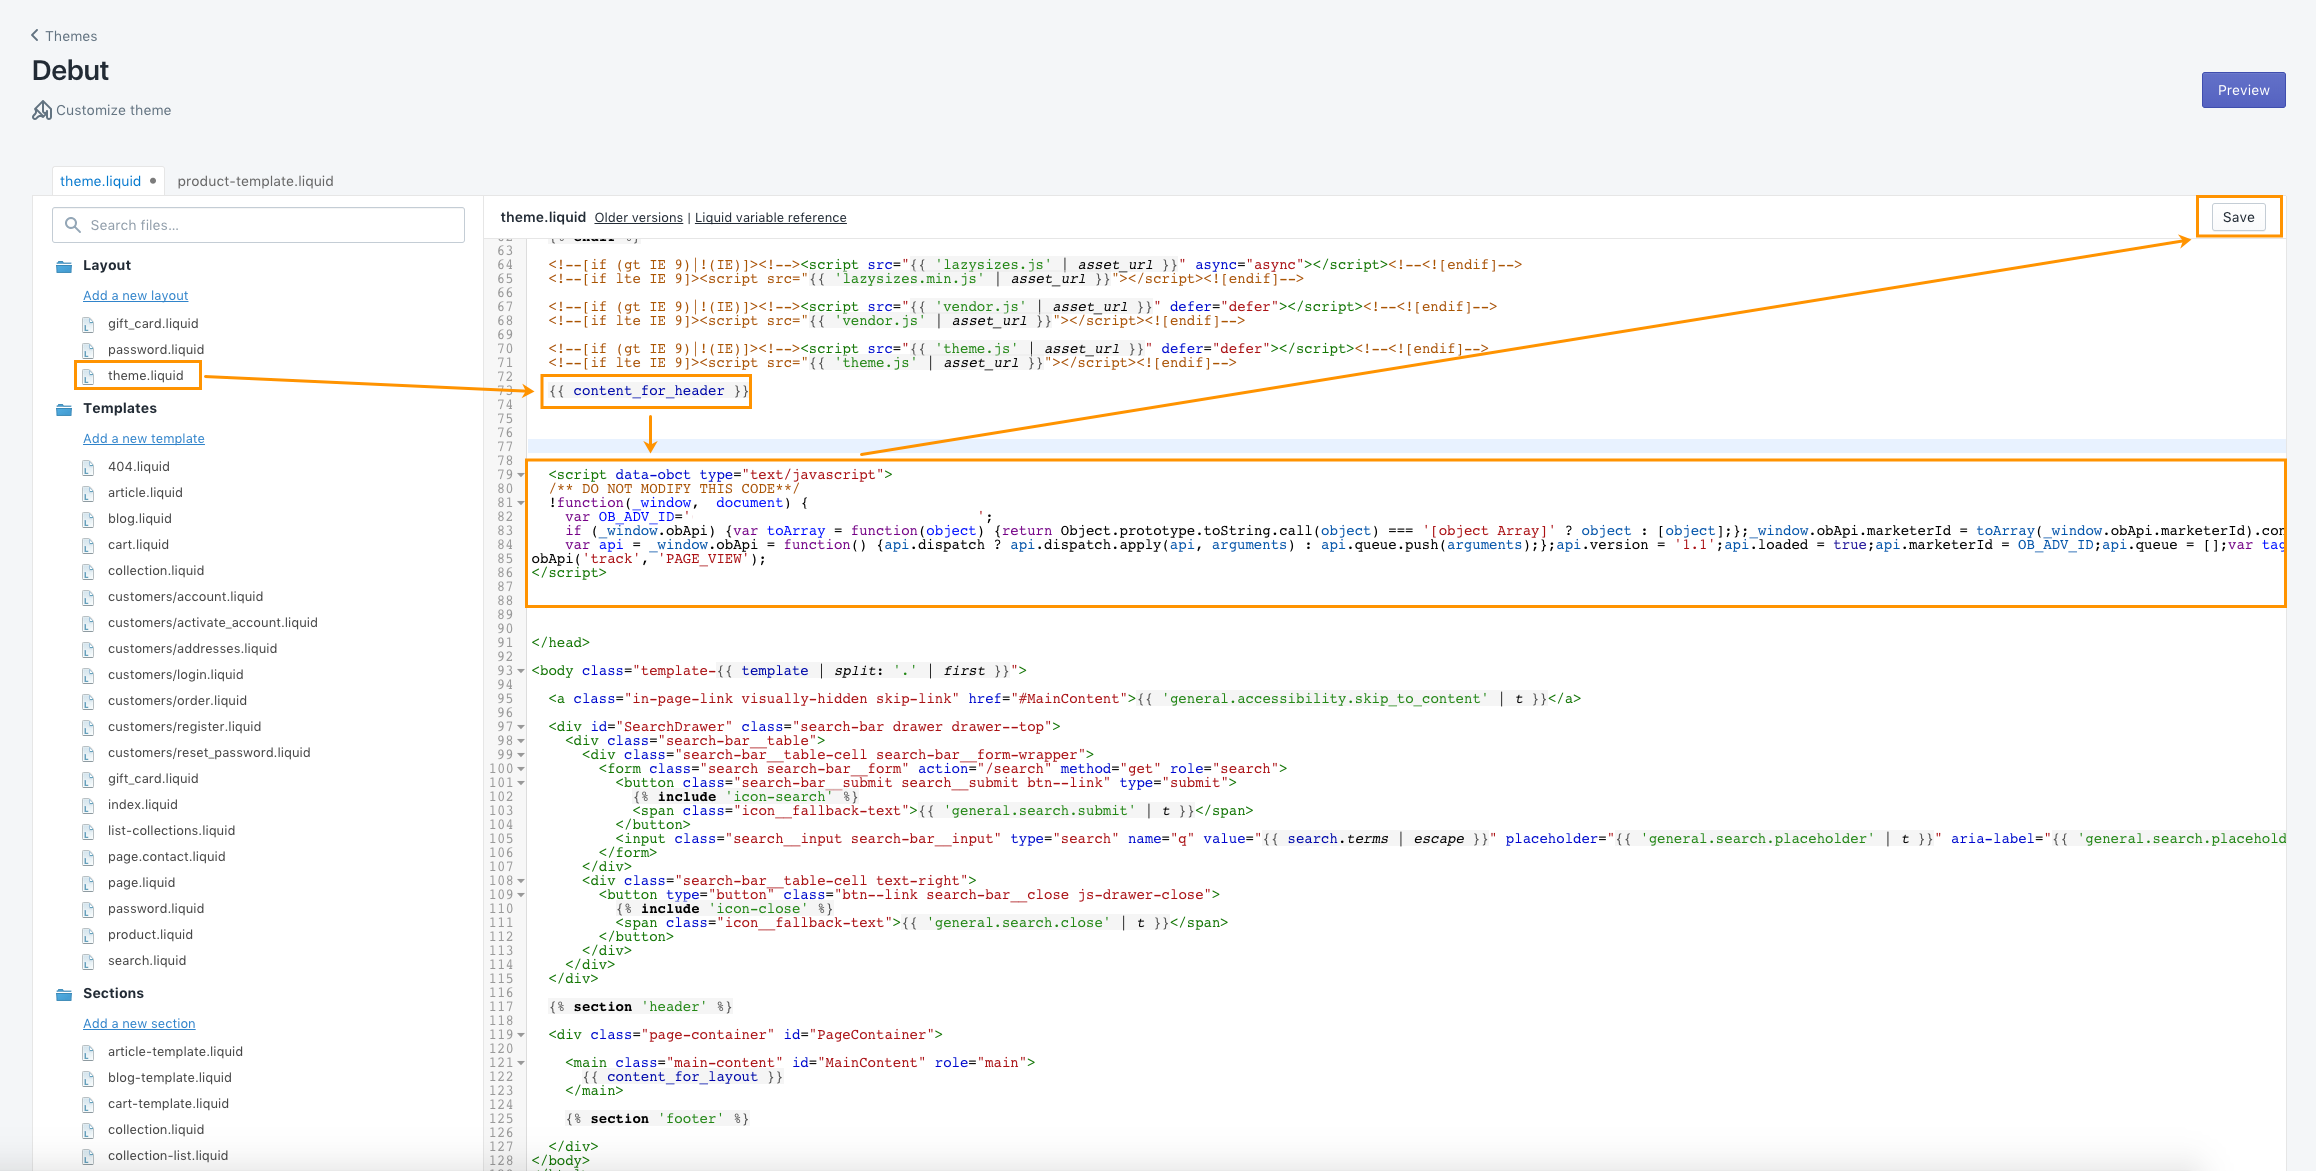
You should now see the “PAGE_VIEW” pixel fire on most pages on your site. Test it out using our Chrome Pixel Tracker.
Tracking Conversions
Next, we’ll guide you through the pixel implementations for three common conversion points in the purchase funnel.
Add to Cart
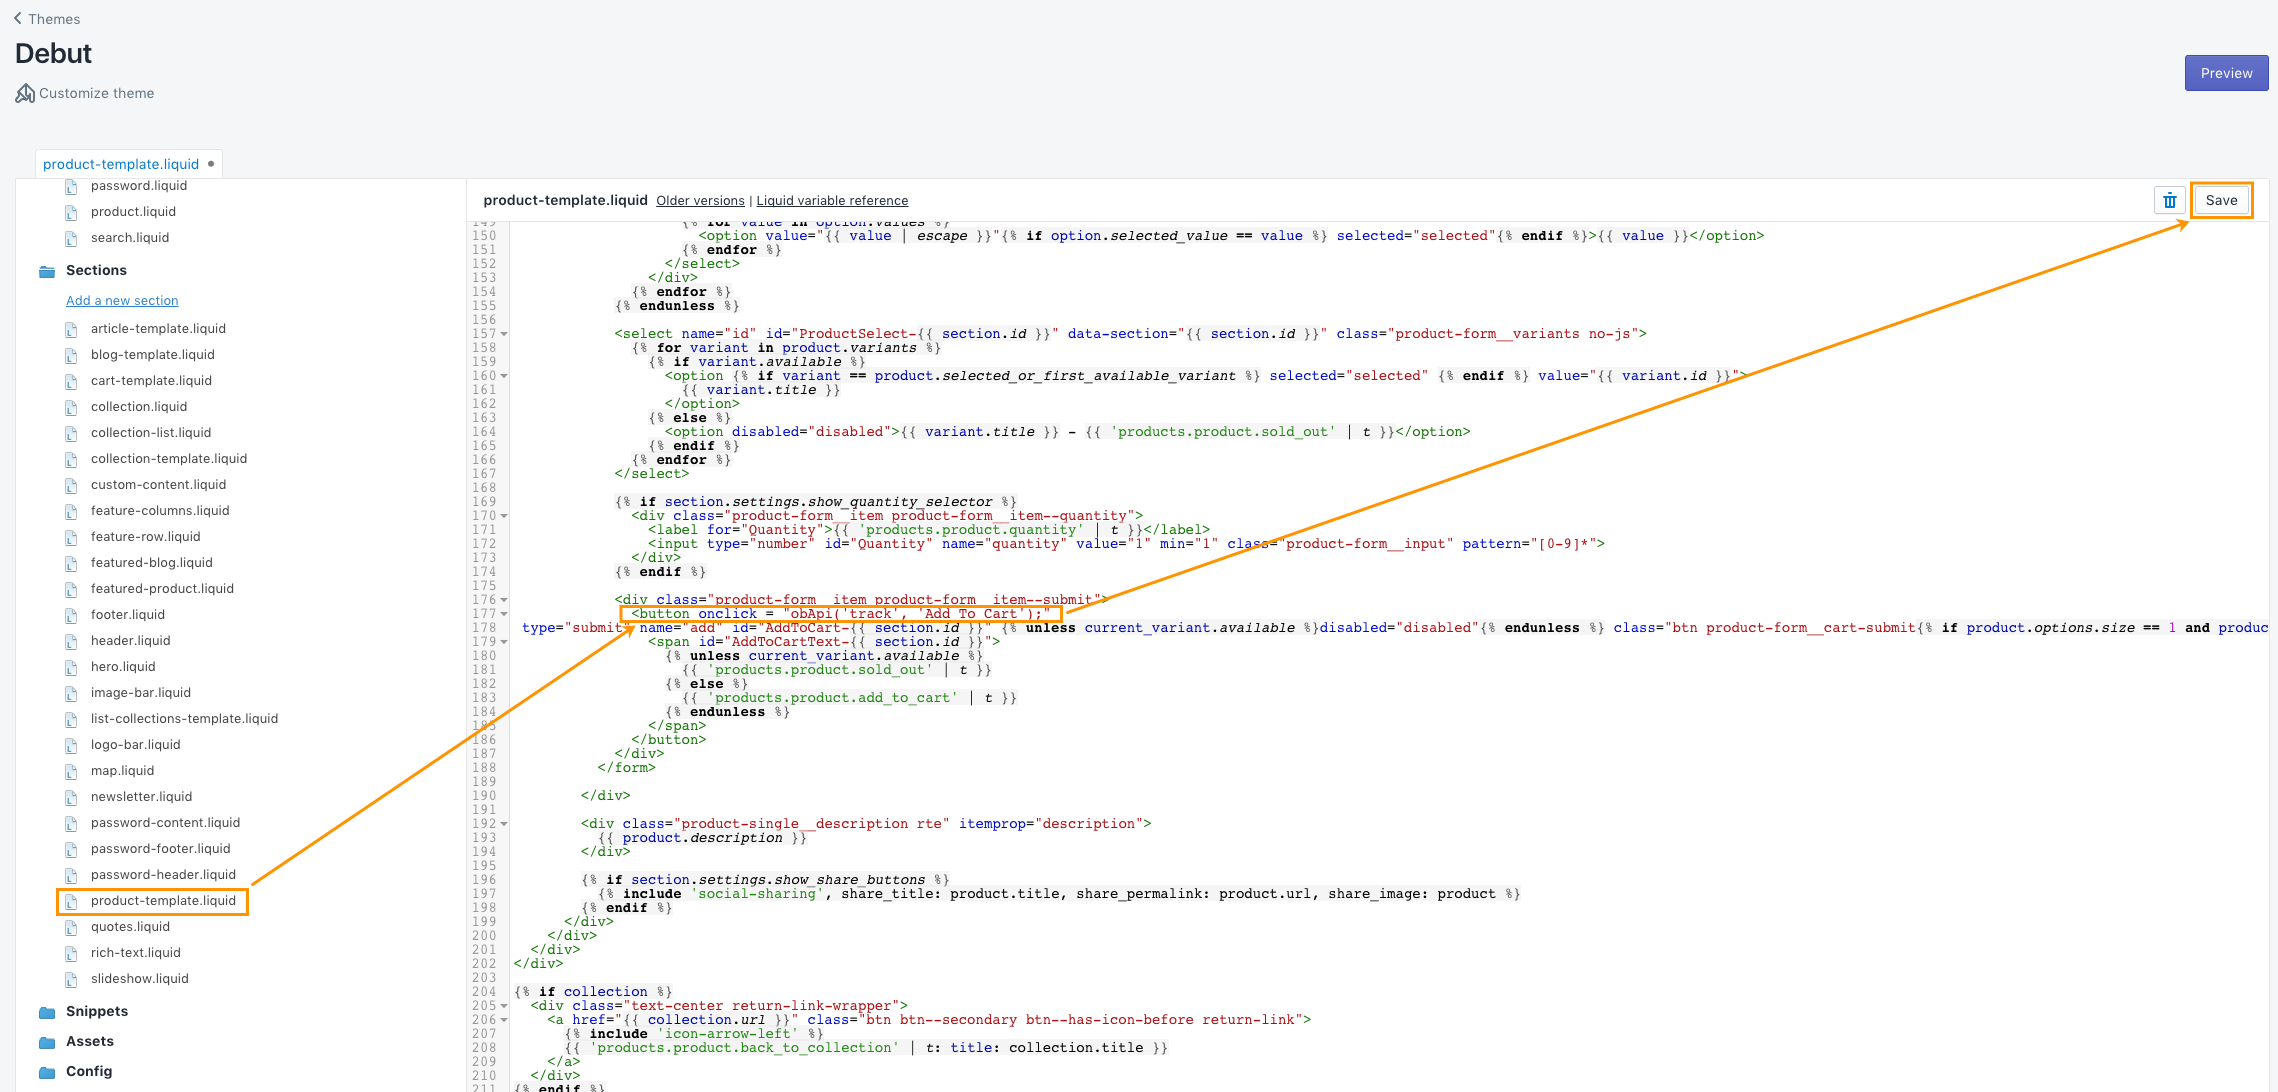
Want to track when a customer adds a product to their cart? First, create an event-based conversion named “Add to Cart” in the Amplify dashboard and copy the event pixel code to your clipboard.
Locate the file in Shopify that contains the button where the Add to Cart action takes place. The location will vary depending on your Shopify setup, but the Add to Cart button is commonly found in the “product.template.liquid” file under the Sections folder. If you aren’t sure how to locate it, right-click the button on your site to inspect the element, then find the ID or class name.
Within the relevant Shopify theme, the button will be identified by an “Add to Cart” button or input tag. Within the tag, add this “onclick” attribute to trigger the Outbrain conversion code:
onclick="obApi('track', 'Add To Cart');"
Click the “Save” button in the top-right corner to finish.
Checkout Intent
You can also track when a customer reaches the Checkout section of your site. To do this, first create an event-based conversion named “Checkout.”
Next, locate the file where the Checkout button is defined. The location will vary depending on your Shopify setup, but the Checkout button is commonly found in the “cart-template.liquid” file under the Sections folder. If you aren’t sure how to locate it, right-click on the button on your site to inspect the element, then find the ID or class name.
Add the following piece of code within the Checkout button or input tag in the file:
onclick="obApi('track', 'Checkout');"

Purchase Confirmation
To track when a customer successfully completes a purchase, create a new event-based conversion named “Purchase.”
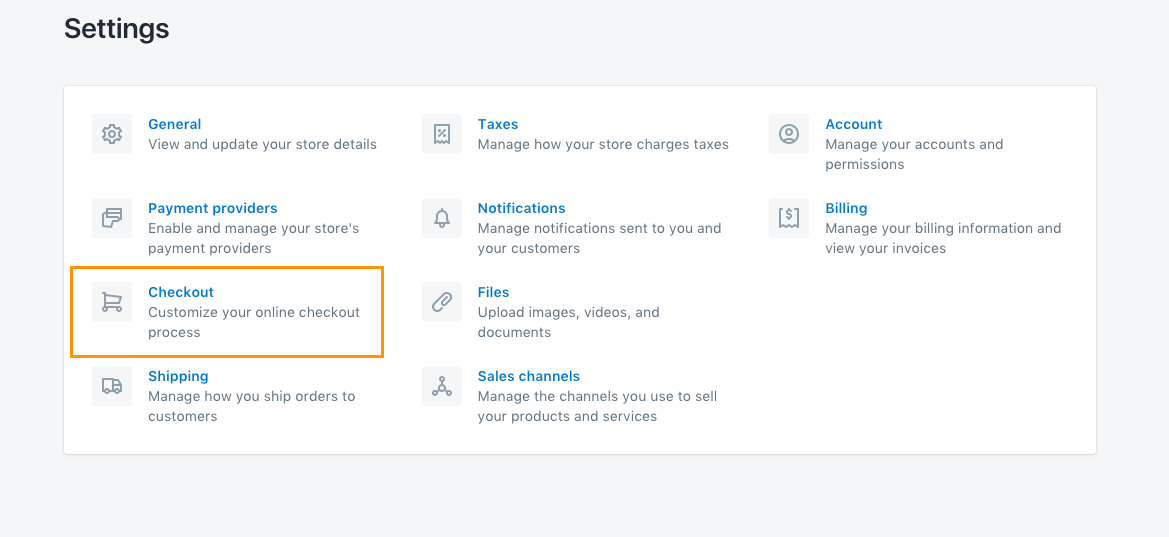
Next, in Shopify, click “Settings” in the bottom-left corner.

Select “Checkout” among the Settings options.
Scroll down until you see “Additional scripts.” In that field, first paste the conditional statements below; this is required to prevent the conversion pixel firing more than once when a user returns to the order status page.
{% if first_time_accessed %}

<!-- Conversion scripts you want to run only once -->
{% endif %}

<!-- Scripts you want to run on every visit -->
Then, paste the Outbrain pixel copied from the Conversions tab of your dashboard between “if” and “endif” conditional statements.
Finally, underneath the Outbrain pixel, add the following code:
<script>
obApi('track', 'Purchase', {orderValue:'{{ total_price | money_without_currency }}', currency: 'USD'});
</script>
With all the conditional statements and pixel codes added, this is what the “Additional scripts” field should look like:

Verification
To test whether or not the conversion works, install Outbrain’s Pixel Tracker extension from the Chrome Store. When you click to the defined conversion point on your site, you should see the conversion name (“Add To Cart,” “Checkout,” or “Purchase”) appear in the Pixel Tracker.
You can also test to make sure that the pixel fires by going to the Conversions tab in your Amplify dashboard. If the Tracking Status column for the defined conversion reads as “Active,” then you’re all set. If it still reads as “Pending,” it means the conversion hasn’t been correctly implemented yet.
Important to Note
- The suggested event-based conversion names are provided to make it easier for you to follow along with the guide and to allow for direct comparison between the screenshots and your own Shopify platform. However, if you choose to change the event name for any of the conversions, please make sure the pixel code that you place around the action button reflects this change in name. Otherwise, Shopify and your Outbrain dashboard won’t sync.
- Due to the nature of the Shopify platform, our Support team is unable to assist with troubleshooting pixel and conversion setup within Shopify. We recommend only using this conversion style if you or someone on your team knows the ropes.
If you have any questions about the implementation process, don’t hesitate to reach out to our DIY Customer Success team.